Installation
First Steps
- Install the Screen: Follow the manufacturer’s instructions for installing your screen. Some screens may require additional software, while others might not.
- Test the Screen: Ensure your hardware is functioning correctly by testing it with RaspberryOS, Ubuntu, or your preferred distribution.
- Proceed to Install KlipperScreen: Once you’ve confirmed that the screen is working, you can proceed with installing KlipperScreen.
Setup
The installation script is designed for RaspberryOS Lite, but it should work on other Debian derivatives as well.
Auto Install
KIAUH is a tool that helps you install or upgrade Klipper, Moonraker, Mainsail, and other extensions.
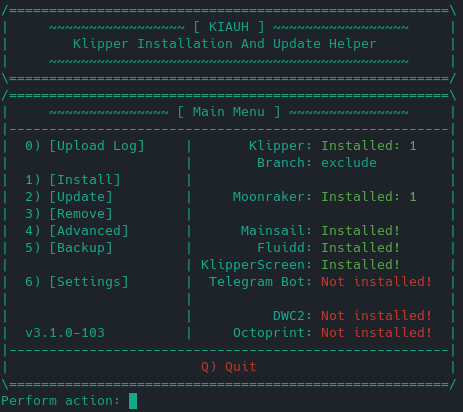
Visit KIAUH on GitHub to learn more and view its documentation.
Manual Install
Follow these steps to manually install KlipperScreen:
Clone the KlipperScreen repository and run the installation script:
cd ~/
git clone https://github.com/KlipperScreen/KlipperScreen.git
./KlipperScreen/scripts/KlipperScreen-install.sh
This script will install the necessary packages, create a Python virtual environment at ~/.KlipperScreen-env, and install a systemd service file if you select it on the install.
If you want to run the install script silently do:
Tip
If you need a custom location for the configuration file, you can add the -c or --configfile option to the systemd file and specify the desired location.
Graphical Backends
KlipperScreen can be run under various backends like Xserver or Wayland compositors like Cage or Weston.
See the Backends page for a detailed comparison and installation instructions.
Moonraker Configuration
-
Ensure that the IP of the device is a trusted client in
Alternatively, add the Moonraker API key tomoonraker.conf:KlipperScreen.conf. -
To use the update manager feature of Moonraker for KlipperScreen, add the following block to
moonraker.conf:
Tip
If you see warnings in other UIs, ignore them until KlipperScreen finishes installing and Moonraker is restarted.
Printer Configuration
Add the following basic configurations to your printer.cfg file for correct functionality:
Macros
You may need additional macros for the printer to function as expected. For more information, read the macros page.